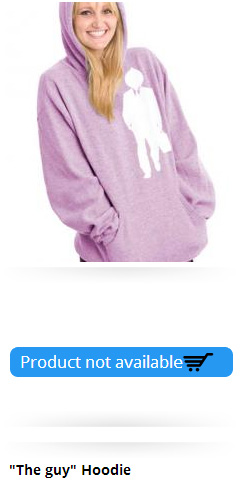
In this tutorial I will show how to create an out of stock badge for Drupal Commerce (Or Commerce Kickstart to be specific) using a simple rule, the add to cart form and some CSS. If you are currently using the add to cart form in the product list this tutorial might not work for you.

I remember setting up a clothing store using Ubercart a couple of years ago, and the most frustrating thing about it for me was that there was no way to show an out of stock badge for products with attributes. You had to click on the product and choose the attribute you wanted, only to find out that the product was out of stock. This seems like a really bad user experience and would probably cause the user to become frustrated and leave, causing you to lose a potential customer.
Now I am working on another clothing store and decided to go with Drupal Commerce, unfortunately I faced with the same problem again and couldn't find any way to display an out of stock badge for products with attributes. However this time I managed to create my own out of stock badge due to the enormous flexibility of Drupal Commerce using Rules and a little bit of CSS hacking.
Getting started
First of all you are going to need the following:
Once you have made sure you have these requirements we can continue. I am using Commerce Kickstart in order to give me a good starting point so there might be some requirements that I am forgetting, but basically I think these 3 modules are all you need.
The key ingredient
Here is the magic rule that you will have to import (admin/config/workflow/rules/reaction/import):
{ "rules_out_of_stock" : {
    "LABEL" : "Out of Stock",
    "PLUGIN" : "reaction rule",
    "REQUIRES" : [ "rules", "entity" ],
    "ON" : [ "commerce_product_presave" ],
    "IF" : [
      { "entity_is_of_type" : { "entity" : [ "commerce-product" ], "type" : "commerce_product" } },
      { "data_is" : { "data" : [ "commerce-product:commerce-stock" ], "value" : "0" } }
    ],
    "DO" : [
      { "data_set" : { "data" : [ "commerce-product:status" ], "value" : 0 } }
    ]
  }
}
This rule is the courtesy of akalata and was found here
When enabled, this rule will disable product variations that are out of stock. So let's say you have a sweater with 3 different sizes: "Small", "Medium" and "Large". Once one of them reaches 0 in stock, the rule will disable that variation leaving only Medium and Large to choose from. So when the last available size runs out of stock the add to cart button will say: "Product not available"
Another rule found on the same page and created by kirie is also pretty useful alongside this one since it enables the variation again once it is back in stock. Just in case you forget to enable it when adding more stock:
 { "rules_stock_enable_product_when_back_in_stock" : {
    "LABEL" : "Stock: enable product when back in stock",
    "PLUGIN" : "reaction rule",
    "TAGS" : [ "Emoda" ],
    "REQUIRES" : [ "rules", "entity" ],
    "ON" : [ "commerce_product_presave" ],
    "IF" : [
      { "entity_is_of_type" : { "entity" : [ "commerce-product" ], "type" : "commerce_product" } },
      { "data_is" : {
          "data" : [ "commerce-product:commerce-stock" ], "op" : "\u003E", "value" : "0"
        }
      }
    ],
    "DO" : [
      { "data_set" : { "data" : [ "commerce-product:status" ], "value" : 1 } }
    ]
  }
}
The Add to cart form
In it's current form the rule is already providing better UX because it causes the variations that are out of stock to disappear from the select list so users don't have to select it on it only to find out that it is out of stock, because it simply isn't there anymore.
So now that we have the rule implemented it is time to make the add to cart badge show up on the product list's so that we can implement the CSS hack and manipulate it to serve as a out of stock badge.
Start by going to "admin/structure/types" and click "Manage Display" for the variation type you want to create the badge for. Next click on "Product list" and find either "Product" or "Product variations" in the list and click on the select list for it's format and choose "Add to Cart form". Finally move the field so that it is positioned right below the product image.
Now save and check your product list. The add to cart form should now be visible below the product image like in the example image here to the right, although most likely it doesn't look very pretty.

The CSS Trickery
Now that we have the add to cart form there we can begin hacking it to serve as a out of stock badge. You will have to add some CSS into your theme in order to hide the add-to-cart form when the product is in stock and only display it when out of stock.
Add the following code to the bottom of your themes stylesheet: (NOTE: If you are not using Commerce Kickstart the following code might not work for you, however you should be able to figure out what is going on and implement it yourself, given that you know some CSS)
.view-collection-products .field-type-commerce-product-reference {
padding: 0;
margin: 0;
}
.view-collection-products .field-type-commerce-product-reference form.commerce-add-to-cart .form-submit.form-button-disabled {
margin: 0;
margin-top: -120px;
background: #FF4747;
text-align: center;
width: 100%;
padding: 10px 0 10px 0;
-moz-border-radius: 0;
-webkit-border-radius: 0;
-khtml-border-radius: 0;
border-radius: 0;
}
.view-collection-products .field-type-commerce-product-reference form.commerce-add-to-cart {
padding: 0;
height: 1px;
}
.view-collection-products .commerce-add-to-cart.in-stock {
display: none;
}

That's it! Now your products in the product list should look something like the image here to the right. However the text still says "Product not available". So all you have to do is change that to "Out of stock" or something like that, which I did it quickly using the Locale module since the website I was working on was in Icelandic anyway.
Now if you are using Commerce Kickstart you might want to use these styles as well since it will create the badge on the "All Products" page as well.
.page-products .field-type-commerce-product-reference {
padding: 0;
margin: 0;
}
.page-products .field-type-commerce-product-reference form.commerce-add-to-cart .form-submit.form-button-disabled {
margin: 0;
margin-top: -120px;
background: #FF4747;
text-align: center;
width: 100%;
padding: 10px 0 10px 0;
-moz-border-radius: 0;
-webkit-border-radius: 0;
-khtml-border-radius: 0;
border-radius: 0;
}
.page-products .field-type-commerce-product-reference form.commerce-add-to-cart {
padding: 0;
height: 1px;
}
.page-products .commerce-add-to-cart.in-stock {
display: none;
}
This is the first tutorial I create so I would love some feedback and stories from people who try this out. Shoot me a message on twitter if you have any.
